7 Things About Earthquake Safety
SDSU provides earthquake safety tips in advance of the statewide earthquake drill on Oct. 21.
In the meantime, taking steps to minimize injury and damage to SDSU students, faculty and staff and their homes, dorms, apartments or offices during an earthquake has never been more important, especially with recent seismic activity around the world.
Many in California fear “the big one,” and taking precautions before it hits will prevent personal injury and costly damage to buildings and personal property. The seven steps included below will help before, after and during an earthquake:
Step #1: Look for Possible Hazards
Secure anything—such as bookshelves or supply cabinets—that can potentially injure you or cause damage if it falls down because of an earthquake. Use closed hooks for any hanging awards, pictures or art displays, and only light art should be placed over beds or sofas where people may be located during an earthquake. Move any heavy or expensive objects to lower shelves, and apply any hooks or specialized earthquake-proof material to secure objects on open shelves like glass, lamps or pottery.
Step #2: Create a Plan
Meet with co-workers and/or roommates so that you know what the designated safety plan is for your building(s). Review any earthquake evacuation maps posted in your apartment, dorm or office, and ask what directions you may need to follow in case of an earthquake. Safety coordinators and resident advisors will direct people to the safe place outside your office or dorm to gather once the shaking stops. If you live in an apartment, come up with a plan that includes where you and your roommates should meet. There will more than likely be aftershocks, and possibly hazards outside including fire or unstable ground.
Step #3: Prepare an Emergency Supplies Kit
Make sure to have multiple kits in most common areas of your home, office or dorm. Supplies that should be included are:
- Medications
- First Aid kit
- Bottled water
- Whistle
- Sturdy shoes
- Phonebook
- Snack foods
- Working flashlights with new and spare batteries
- Necessary toiletries
- Copies of personal identification
- Portable radio
- Comfortable, warm clothing
- Blankets
Personal emergency supply kits are available on-campus from Grainger or can be purchased online through the American Red Cross or in-person from retail stores, such as Target or Wal-Mart.
Step #4: Look Out for Building Weaknesses
All buildings are designed to withstand the downward gravitational pull. However, all earthquakes shake in different directions. There are many issues that can limit a building’s ability to withstand shaking, including any weak spots. All buildings including dorms, classrooms, offices and facilities at San Diego State have been inspected and are safe to be in if an earthquake should occur.
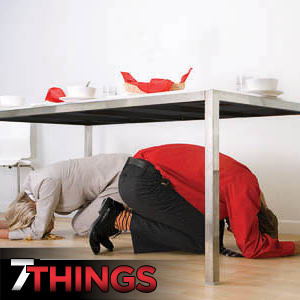
Step #5: Protecting Yourself During an Earthquake
The “Drop, Cover and Hold” method is the best way to protect yourself during an earthquake. If you are inside during an earthquake, pick out a sturdy table or desk nearest to you and hold on to it until the shaking stops. If you are in a lecture hall, put your head near your knees and protect your head and neck. Stay away from any windows, hanging objects, tall furniture or cabinets. If you are in bed when an earthquake occurs, stay in your bed and cover your head with a pillow until the shaking stops. Before getting out of bed, look for broken glass or anything that may be hazardous to your feet. If you find yourself outside, move to an open area clear of power lines, trees, buildings or anything that could possibly become a hazard. If you are near the coast and an earthquake lasts for more than 20 seconds, evacuate inland at least two miles from the coast or to higher ground at least 100 feet high.
Step #6: Check for Injury or Damage
Once the shaking has stopped, check to see if you or your roommates, co-workers or families are all okay. If you are trapped by fallen objects or are stuck underneath debris, cover your mouth, nose and eyes from dust. Signal for help by using a cell phone, whistle or tapping on objects as emergency crews will be listening. Check for damage in your apartment, office or dorm, and put out any small fires that may occur. If there is any electrical damage in your building, power may be cut off, so avoid using elevators or other electronic equipment.
Step #7: Follow Your Disaster Plans
Aftershocks may occur days, weeks or possibly months after an earthquake hits. Follow the prepared plan. Be in communication with your family, co-workers, and roommates, as well as emergency officials for instruction. If your home, office or dorm is safe to live in again, don’t hesitate to get your life and routines back in order. If there is any damage to your dorm or office, let the appropriate people in Business and Financial Affairs or Residential Life know, so that it will be repaired. If your home, apartment, office or dorm is unsafe, relocate to a safe setting and let others know where you are going. After you have recovered, go back and take these precautions again by reviewing steps that were skipped previously. And prepare in case another major earthquake hits in the future.
For additional information on earthquake safety, visit the Earthquake Country Alliance, the Great California Shakeout or Drop, Cover and Hold On.